Building the perfect Monstie in Stories 3 is a process that require a good knowledge and grasp of how the different game system interacts. Good thing I studied it in depth and can share this knowledge with you.
For this article, I will often use Ebony Odogaron as an example as I built a few to test things out.
- Understanding your Monstie species
- Getting the right egg
- Ecosystem Rank and Skills
- Dual element
- Getting the right genes
Understanding your Monstie species
The first thing is obviously to chose the species you want to use. But what does the species impact?
Species impacts four things:
- the Monstie base stats and elemental resistances/weaknesses
- its Bingo Amount Bonuses
- its Kinship attack
- some guaranteed attack genes (less important)
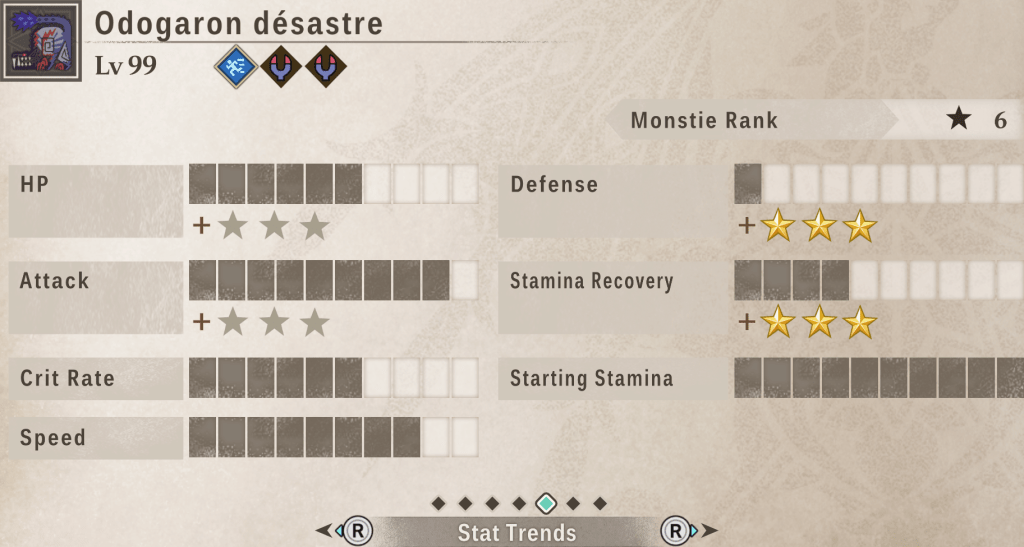
The base stats are essentially the same as in Pokemon: each species has a specific set of stats that can’t be changed no matter what. Gravios will always be a tanky Monstie while Odogaron will always be on the more glass cannon side.
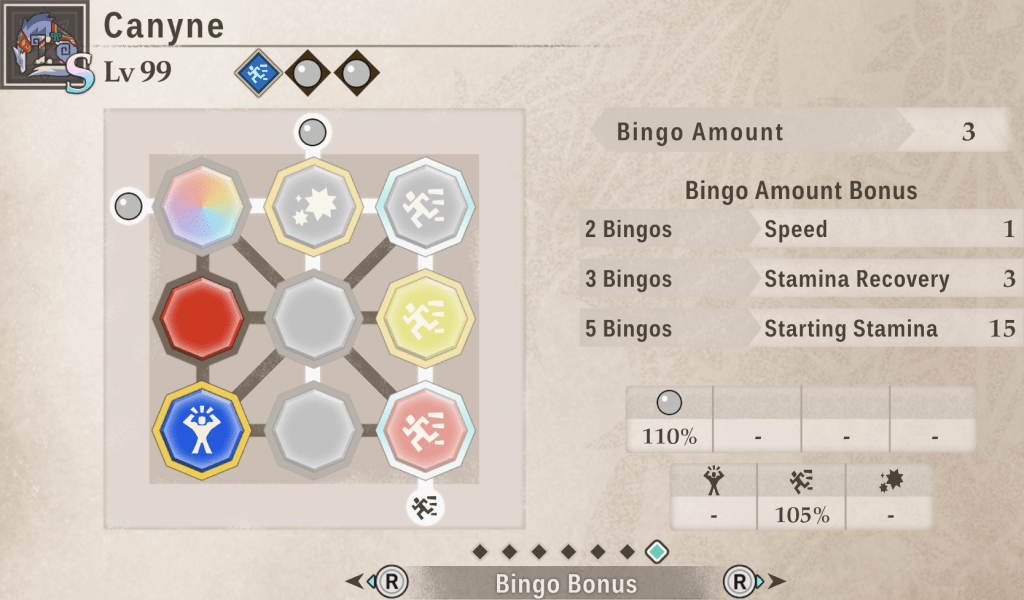
The Bingo Amount Bonuses is also important to understand. Completing 1, 3 or 5 bingos will grant your Monstie stat increases based on the species. It’s for instance an important part of the “Child Labor” strategy used with a Palamute spamming Nourishing Pinecones and White Shadow with high stamina recovery as its 3 bingos bonus is +3 in Stamina Recovery.
For the rest, the attack genes can be changed with the Channeling Rite but the Kinship Attack and its element is set no matter what (more on that in the dual element section). The Kinship Attack can help you sometimes decide your build. For instance, Fruit Barrage from Bishaten inflicts various statuses, meaning it might be better to gear him towards a status build.
Understanding where your Monstie excels and where it lacks can help you increase its strength or cover for its weaknesses.
Getting the right egg
First thing to know is that an egg potency only impacts the gene pool of the Monstie. A S rank egg will only have higher chances to get better genes and more genes in its original bingo. But this means there’s no point to specifically target a high potency egg if you only want to set the species.
The only thing to check when you hatch a Monstie is its Tendencies. In the Skills page of its profile, a Monstie has a Stamina Tendency and a Skill Tendency. These are set as the Monstie is hatched and can’t be changed later.

Stamina Tendency impact how aggressive the Monstie will be in its stamina management. A Proactive Monstie will essentially burn through their stamina on their own and use Second Wind once they can’t use any active skill. An Average Monstie will tend to mix in a few regular attacks to offset the stamina loss while a Cautious Monstie will use Second Wind more often, even when they still have stamina to act, meaning you will have more stamina to issue orders when needed (but doing so will generate 5 less kinship points). As a result, Cautious Monstie might be able to use higher cost stamina moves but will also deal less damage on their own.
Skill Tendency determines what kind of the skill the Monstie will priorize on its own. A Support Monstie will privilege moves boosting its party while a Hindrance Monstie will try to reduce the opponent’s stats. And an Attack Monstie will obviously focus on more offensive skills.
Ecosystem Rank and Skills
Excursions can be used to send a Monstie in a specific Ecosystem to get 2 Stats Increases. At 3★ rank, they grant these stat buffs:
- Attack: +80 attack
- Defense: +80 defense
- HP: +120 HP
- Stamina Recovery: +5 stamina recovered each turn
These are important as they can help tweak your Monstie stats to cover for some of its weaknesses. For instance, I used an Ebony Odogaron to clear the infamous Narwa and Ibushi fight. And while it’s great offensively, it has one of the worst defense in the game. So I used the Bonuses Increases to raise this stat and grant it more chances to survive the duo random AoEs. Another example is the “Child Labor” Palamute who want a Stamina Recovery bonus to raise its Stamina Recovery to its absolute peak.

S ranking a Monstie in an environment impacts 3 things:
- its species S rank attack skill
- its Environment Skills
- granting it a second element
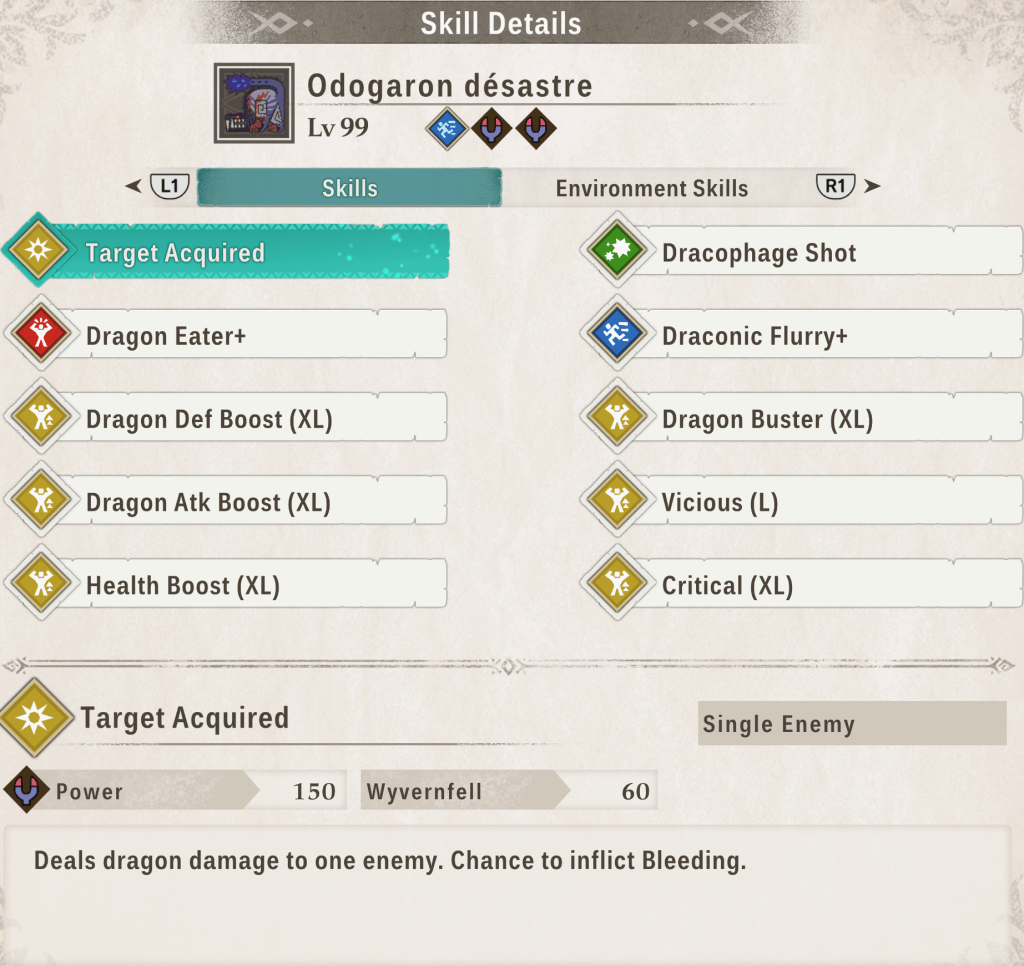
Each Species has a specific attack gene that has two variants, the base one and the S rank one. Not much to note, the S rank skill can only be acquired by an egg in an environment where the species is at S rank and has an improved stat. For instance, Draconic Flurry from Ebony Odogaron turns into Draconic Flurry+ going from 50 Power to 60. Meanwhile Night Parasites from Malzeno turns into Night Parasites+, costing 30 stamina instead of 35. This can be useful to get better genes to transmit through Channeling Rite.
Environment Skills are skills that are linked to an environment and are outside of the bingo system. Your Monstie will automatically learn the skills from the environment it’s from if he’s at S rank. You can teach it skills from other environment but only if he’s also S ranked in these environment. It can also only have 3 Environment Skills, meaning you’ll have to chose 3 between the 6 you want to learn. As a general explanation:
- Azuria skills help with Stamina management
- Canalta skills help with self buff duration and Head-to-Head
- Tarkuan skills help with Kinship Gauge and Riding Gauge
- Serathis skills grants buffs when you lose one Hearth
Each Environment skill also has an improved version. This version will be triggered if your Monstie has the right genes in its bingo. As these will require specific elements genes, this means they might be better on a specific element Monstie.
Dual element
Doing its own section on that one as there is a lot to cover.
If your Monstie is at S rank in an area, it will get this area element. This will change its appearance but also grants its different buffs and demerits.

Using a move from an element your Monstie doesn’t have reduce its performance by 10%. If your Monstie gets the corresponding element with the dual element system, it negates that debuff, meaning it will be as powerful as a regular Monstie from this element. This was tested with a fire Ebony Odogaron and a Dreadking Rathalos, both species having the same attack value: they effectively deal the same damage with fire moves. There’s no direct offensive benefit to only using one element, a fire Ebony Odogaron deals as much damage as a dragon Ebony Odogaron (with double dragon element too).
Going dual element can alter the Monstie element weaknesses. There doesn’t to be a general rule and it seems to be more species based but sometimes, an elemental weakness can get increased. The element resistance/weakness multipliers are as follows:
- Extra weak: 150% damage taken
- Weak: 125% damage taken
- Neutral: 100% damage taken
- Resistant: 90% damage taken
- Highly resistant: 70% damage taken

The other issue with going dual element can be gene splicing. As your Kinship attack element can’t be changed, you might want to use two different elements in your bingo, lowering the performance of both elements as you will complete less overall elemental bingos.
Getting the right genes
At this point, you have your Monstie, you’ve selected its element, tendencies, environmental skills and stat increases, only thing left is to chose which Active and Passive skills to give it through the Rite of Channeling.
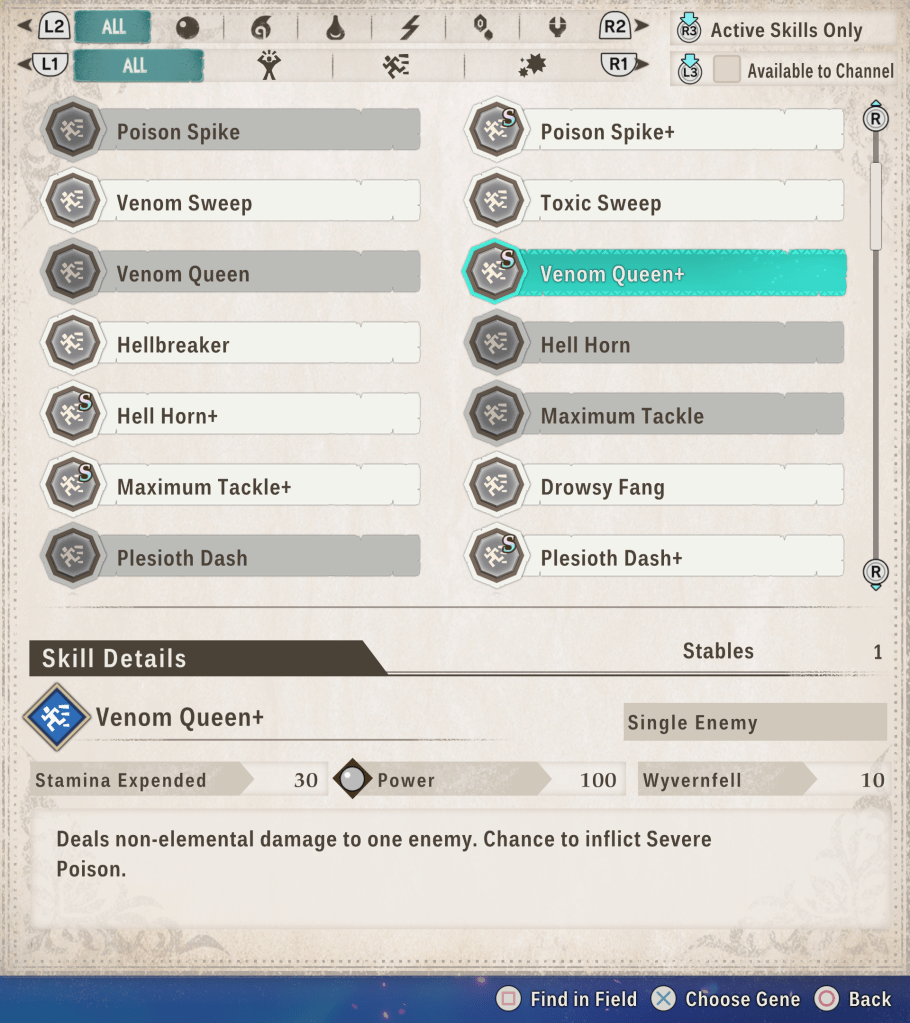
Obviously the first priority might be to give it one Attack of each Type to make sure you can answer to any Head-to-Head coming your way. Using the “Select Genes from List” feature is great for this as it provides you with all the intel you could need. You press L3 on a controller or V on a keyboard to see all the skills existing, even those you don’t have. Pressing then □ or F will show you from which monsters eggs and in what environment you’ll be able to get this gene.
Note that it will only show you the skills you already managed to get once. You can also check all skills existing in game with this spreadsheet: https://docs.google.com/spreadsheets/d/1UqLviLsplDUugTIWiC5drsJnf-XbkZU62QGQNadgSfA/edit?gid=1582645633#gid=1582645633
You can check on the Monster Genes page which species to target if you never got a gene you want. Some of the genes can be easier to get on specific species. For instance, while All-Out can be obtained on both Aknosom and Yian Garuga, I had an hard time to get it on Aknosom while Garuga dropped it pretty consistently.

When selecting your Active Skills genes, keep in mind the stamina management of your Monstie. As explained before, having high skill cost on a Proactive Monstie might leave you unable to issue commands when a Head-to-Head comes.
Once the Active Skills are set, you can add the Passive Skills. This is where Egg Potency comes in play when getting eggs from nest as there are multiple ranks of these skills and higher potency eggs have more chances to give you more genes and at higher ranks. Usually, highly potent eggs have 2 L ranked skills at least.
To get 2 highly potent eggs reliably, you can use a paintball on a monster before defeating it, even using a Quick Finish. The monster will then flee to its own nest where you’ll be able to gather 2 eggs. Don’t hesitate to defeat the monster a second time in the nest as it will allow you to skip Rudy’s dialogue when picking eggs.
Passive Skills can be used to push even higher your Monstie stats or cover for its weaknesses. For instance, I sacrificed some dragon bingos on my Ebony Odogaron to give it All Elem Def Boost (XL) to increase its elemental resistances and Health Boost (XL), specifically to deal with Ibushi and Narwa random AoEs.
Also note that passive genes with the same name don’t stack. For instance, if you use both Critical (L) and Critical (XL) on a Monstie, Critical (L) won’t have any effect and is essentially a dead slot (unless you use it to complete some bingos).
Offensive Active Skills Buffs
If your Monstie has a buff already active of an higher tier, the lower tier buff will be ignored. For instance, if you use Fiery Flare (1 turn Fire Attack Up L) and then Blazing Howl (3 turn Fire Attack Up S), you won’t get any buff at all as the S bonus will be ignored since you already have a L bonus active, who ends up expiring at the end of the turn.
Getting a buff of the same tier or higher will renew the duration of the buff.
Unless specified, buffs can’t be stacked. Using Fiery Aura who grants Attack Up M twice won’t upgrade it to Attack Up L but it will renew the 3 turn duration back to 3 turn. Meanwhile Egg Skill: Fireform will grant Attack Up S on its first use, Attack Up M on its second and L on its third, refreshing its 3 turn duration every time it’s used.
Stacking buffs will stack even if the buff comes from another skill. For instance, Egg Skill: Red Mastery used after Piercing Roar will improve the Critical M in a Critical L while turning the 2 turns duration of the buff in a 3 turn duration in the process.
Differents buffs are cumulated additively.
Regarding status conditions, a monster inflicted with Burn will take 20% more damage until the status is cured, additive like the other active skills damage buffs. Bleeding double the damage of the next hit endured and it’s multiplicative. Sleep guarantees a critical hit on the next hit endured (1,5 multiplier) while cancelling the monster’s action for this turn if it hasn’t acted yet.
Power Charge
Power Charge is by far the strongest damage buff in the game, but only buffs your next action.
Effects:
- S: +66% damage dealt
- M: +95% damage dealt
- L: +145% damage dealt
Egg Skill: Adamant Rage is stronger than Valiant Flare and Azure Bolt damage-wise (245% VS 225% damage) and don’t have any demerit.
| Skill Name | Element | Buff tier | Duration | Cost | Target | Other effects |
|---|---|---|---|---|---|---|
| Blindside | Neutral | S | 1 turn | 15 | Self | Lock-On (guaranteed hit next turn) |
| Focus Power | Neutral | M | 1 turn | 15 | Self | / |
| Egg Skill: Flame Star | Fire | S | Current turn | 50 | All | User can’t act |
| Valiant Flare | Fire | M | 1 turn | 25 | Self | Fire Attack Up L, Defense Down L |
| Bolt Call | Thunder | S | 2 turns | 30 | Self | / |
| Azure Bolt | Thunder | M | 1 turn | 25 | Self | Thunder Attack Up L, Defense Down L |
| Egg Skill: Adamant Rage | Thunder | L | 1 turn | 25 | Self | / |
Attack Up
Effects:
- S: +10% damage dealt
- M: +20% damage dealt
- L: +30% damage dealt
| Skill Name | Element | Buff tier | Duration | Cost | Target | Other effects |
|---|---|---|---|---|---|---|
| Merciless Roar | Neutral | L | 3 turns | 35 | All | / |
| Best Hoof Forward | Neutral | L | 3 turns | 30 | All | Speed Up L, Defense Down L, Evasion Down L |
| Egg Skill: Fireform | Fire | S | 3 turns | 20 | All | Can be stacked, renew the duration and improve the buff when stacked |
| Fiery Aura | Fire | M | 3 turns | 25 | Self | Attacks can inflict blastblight |
| Flame Aura | Fire | M | 3 turns | 25 | Self | Attacks can inflict burn |
| Mud Armor | Water | M | 3 turns | 20 | Self | Defense Up M, Speed Down L |
| Thunder Aura | Thunder | M | 3 turns | 25 | Self | Attacks can inflict paralysis |
| Pump Up | Dragon | L | 3 turns | 35 | Self | Wyvernfell Up L, Defense Down L |
Element Attack Up
Damage wise, this is the same as Attack Up.
Effects:
- S: +10% damage dealt
- M: +20% damage dealt
- L: +30% damage dealt
Neutral
| Skill Name | Element | Buff tier | Duration | Cost | Target | Other effects |
|---|---|---|---|---|---|---|
| Art of Raw Power | Neutral | M | 3 turns | 20 | Self | / |
Fire
| Skill Name | Element | Buff tier | Duration | Cost | Target | Other effects |
|---|---|---|---|---|---|---|
| Blazing Howl | Fire | S | 3 turns | 20 | All | Fire Defense Up S |
| Heat Up | Fire | M | 3 turns | 20 | Self | / |
| Fierce Heat | Fire | L | 3 turns | 30 | Self | / |
| Valiant Flare | Fire | L | 1 turn | 25 | Self | Power Charge M, Defense Down L |
Water
| Skill Name | Element | Buff tier | Duration | Cost | Target | Other effects |
|---|---|---|---|---|---|---|
| Mud Supply | Water | M | 3 turns | 20 | Self | / |
| Bubbly Dance | Water | M | 3 turns | 25 | Self | Dodge Up M, Regenerate (10% heal each turn) |
| Storm Veil | Water | M | 3 turns | 30 | Self | Thunder Attack Up M, Wyvernfell Up L, Defense Up M |
| Groom | Water | L | 2 turns | 30 | Self | Ailment Inflict Rate Up |
Thunder
| Skill Name | Element | Buff tier | Duration | Cost | Target | Other effects |
|---|---|---|---|---|---|---|
| Storm Veil | Water | M | 3 turns | 30 | Self | Water Attack Up M, Wyvernfell Up L, Defense Up M |
| High Voltage | Thunder | M | 3 turns | 20 | Self | / |
| Ultra Voltage | Thunder | L | 3 turns | 30 | Self | / |
| Azure Voltage | Thunder | L | 1 turn | 25 | Self | Power Charge M, Defense Down L |
Ice
| Skill Name | Element | Buff tier | Duration | Cost | Target | Other effects |
|---|---|---|---|---|---|---|
| Chilling Paean | Ice | M | 3 turns | 20 | Self | / |
| Frost Veil | Ice | L | 3 turns | 30 | Self | Speed Up L |
Dragon
| Skill Name | Element | Buff tier | Duration | Cost | Target | Other effects |
|---|---|---|---|---|---|---|
| Blade Rush | Dragon | M | 3 turns | 25 | Self | Wyvernfell Up M |
| Dragon Surge | Dragon | L | 3 turns | 30 | Self | / |
| Wicked Feast | Neutral | M | 3 turns | 30 | Self | 70 Power, 20 Wyvernfell attack |
Bloodrite
Bloodrite is a status that increases damage dealt by 30% and grants you a Lifesteal effect, turning 30% of the damage you deal as HP. As a trade-off, you lose 20% health at the beginning of your turn.
| Skill Name | Element | Duration | Cost | Target | Other effects |
|---|---|---|---|---|---|
| Bloodrite | Dragon | 5 turns | 20 | Self | / |
Critical Up
Critical hits deal 150% damage, including Wyvernfell damage.
Effects (might be wrong as it’s luck reliant and the % are low, I checked around 50 hits for each):
- S: Crit rate +5%
- M: Crit rate +10%
- L: Crit rate +15%
| Skill Name | Element | Buff tier | Duration | Cost | Target | Other effects |
|---|---|---|---|---|---|---|
| Sharpen Blades | Neutral | M | 3 turns | 20 | Self | / |
| Piercing Roar | Neutral | M | 2 turns | 30 | All | / |
| Skill Egg: Red Mastery | Fire | S | 3 turns | 20 | All | Can be stacked, renew the duration and improve the buff when stacked |
Noteworthy Passive Skills
Passive skills buffs are additive aside from [Element] Atk Boost (XL) who is multiplicative.
Attack Power
| Skill Name | Element | Type | Effects |
|---|---|---|---|
| [Element] Atk Boost (XL) | [Element] | Power | Damage dealt +20% for attacks of the corresponding element |
| Dancer (XL) | Water | Speed | Damage dealt +20% and damage taken -20% at full health |
| All-Out (XL) | Dragon | Power | Active skill damage +30% but stamina cost increased by 20% |
| Critical (XL) | Dragon | Speed | Crit Rate +15% |
Stamina Management
| Skill Name | Element | Type | Effects |
|---|---|---|---|
| Stamina Surge (XL) | Thunder | Speed | Stamina Recovery +6 |
| Stamina Boost (XL) | Water | Power | Starting Stamina +20 |
Survivability
| Skill Name | Element | Type | Effects |
|---|---|---|---|
| Health Boost (XL) | Neutral | Power | HP +20% |
| [Element] Def Boost (XL) | [Element] | Tech | -30% damage taken on attacks from the corresponding element |
| All-Elem Def Boost (XL) | Neutral | Tech | -10% damage taken on all attacks |
| Self-Heal (XL) | Fire | Speed | 20% of total HP healed each turn |
| Crit-Heal (XL) | Dragon | None | 30% of total health healed on critical hit |
| Divine Blessing (XL) | Neutral | None | Medium chance to only take 50% damage |
| Tenacity (M) | Ice | Power | Allows to survive one fatal hit and heal 50 HP |
| Panacea (XL) | Dragon | Power | Can negate abnormal statuses |
Kinship Gauge Management
| Skill Name | Element | Type | Effects |
|---|---|---|---|
| Soul Kinship (XL) | Neutral | Power | Kinship Gauge generation +40% |
| Critical Kinship (XL) | Thunder | None | +15 Kinship on critical hit |
| HtH Master (XL) | Ice | Tech | +12 Kinship when winning a Head to Head |
Status
| Skill Name | Element | Type | Effects |
|---|---|---|---|
| Inflict Rate Up (XL) | Neutral | None | Status Inflict Rate increased |
| Salt in the Wound (XL) | Neutral | Power | +20% damage dealt against monsters afflicted with statuses |
Under 50% HP
| Skill Name | Element | Type | Effects |
|---|---|---|---|
| Heroics (XL) | Fire | Power | Damage dealt +30% |
| Vigilance (XL) | Ice | Tech | Crit Rate +30% |
| Partner (XL) | Thunder | None | Kinship Gauge generation +100% |
| Evasion Instinct (XL) | Water | Speed | Evasion Rate +40% |
| Potential (XL) | Thunder | Power | Damage endured -50% |
