Gogmazios is amongst us with Wilds final TU, allowing Artian weapons to reach unprecedented heights. So how to farm the best weapons and optimize your farming? Let’s find out right now.
- Gogma Materials
- Gogma Reinforce and Skill Resetting
- Rerolling your Gogmazios weapons
- Fighting Gogmazios efficiently
Gogma Materials
Due to its tendency to feed on gunpowder, Gogmazios accumulates various artifacts in the tar on its body. Besides the impressive Convergent Elderbreaker, you’ll see small, bluish-glow clusters on its body: Gogma Materials.
Aside from the fact that these elements take more damage, much like wounds, destroying them allows you to recover Mutated Armaments. You have one set of Armaments guaranteed as quest rewards, one set for triggering the Convergent Elderbreaker, and six other potential sets on Gogmazios itself, which you can destroy during combat. Two Armaments will always be on its arms, with the other four randomly positioned on Gogmazios’s body.
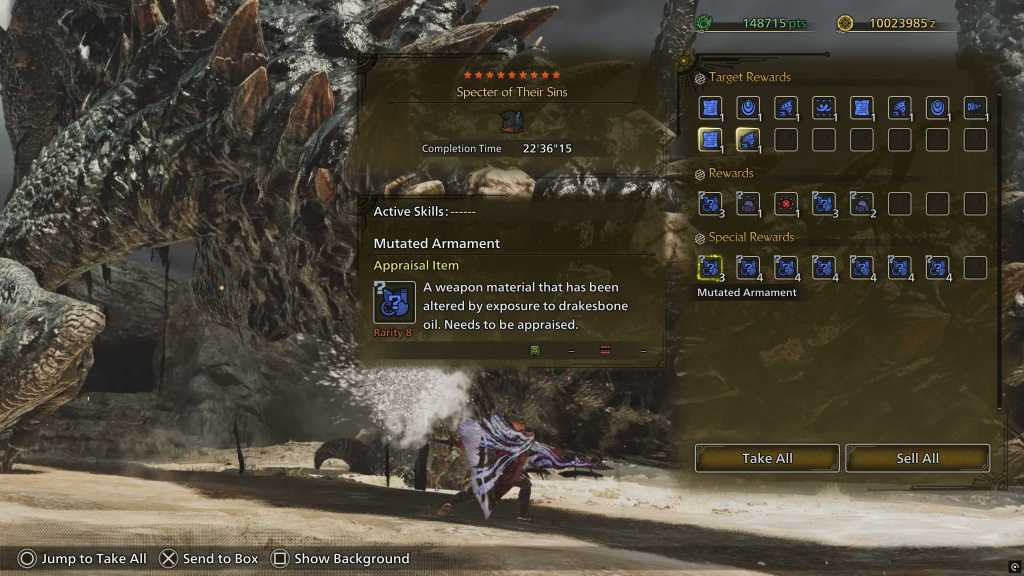
The Armaments you receive will then be transmuted into Tarred Devices to strengthen your Artian weapons, so try to destroy as many as possible throughout the fight. Be warned, however, that if you fail the quest, the Mutated Armaments are lost and you will not receive any Tarred Devices.
Tarred Devices have three potential types: Attack, Affinity, and Element. You can go to the forge to select « Upgrade to Gogma Artian Weapons » and then choose one of your Artian weapons and one of the three possible reinforcements.
- Attack: +10 attack -15% affinity
- Affinity: +10% affinity -10 attack -20 element and 10 white sharpness converted to blue sharpness
- Element: +50 element -5% affinity
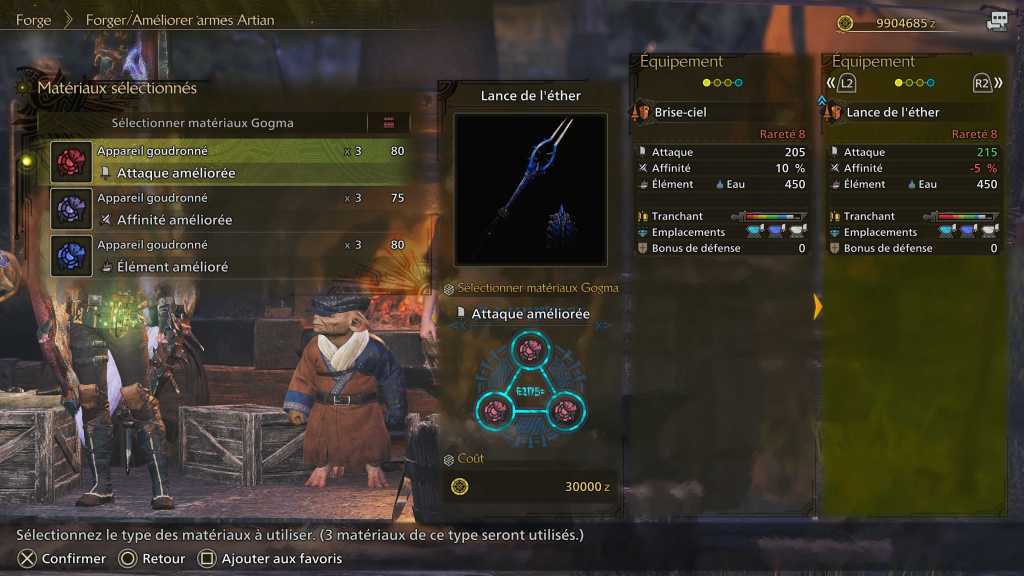
You can use this system with an unreinforced Artian weapon. Furthermore, with this new system, you no longer need to endlessly recraft Artian weapons. Only the three materials used to create the Artian weapon (Attack or Affinity Reinforcement) and your choice of Tarred Devices matter. These four parameters are final, so choose wisely.
Once you have chosen your Devices, your Artian weapon becomes a Gogma weapon. You then receive by default one point for two set skills, including one monster type skill and one monster skill.
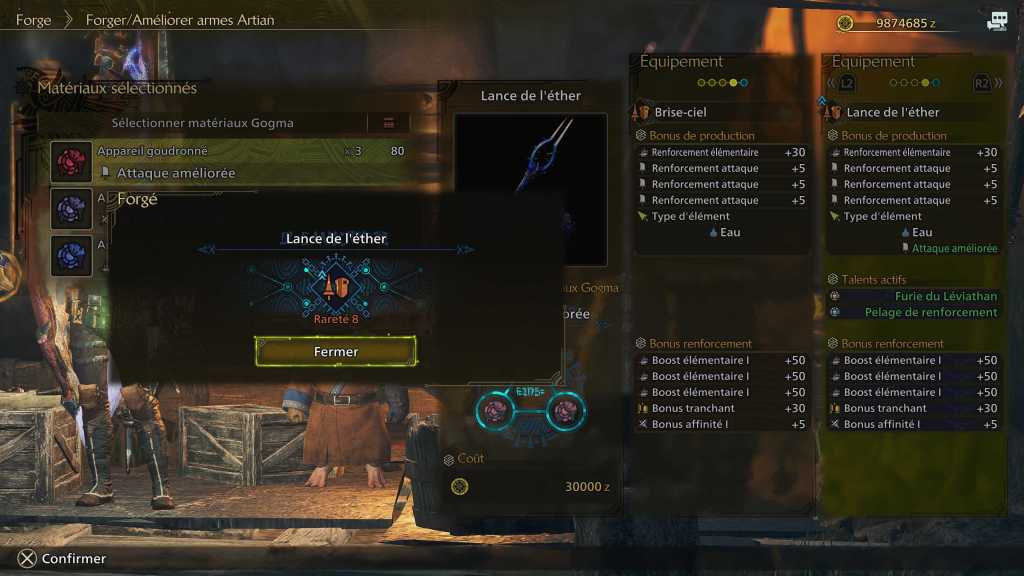
Every set skill can be acquired that way aside from Festival set skills (Festival Spirit and Prayers) and Akuma set skill (Master of the Fist).
Gogma Reinforce and Skill Resetting
Once you have acquired and upgraded your Gogma weapon to level 5 (if the original Artian weapon was level 5, the Gogma weapon will retain that level), you have the option to enhance its Artian bonus rolls and even amend them. Simply select the desired Gogmazios weapon from the dedicated menu, and you can then choose to keep your weapon’s bonuses and attempt to roll stronger versions of them, or completely randomise all 5 bonuses.

Don’t worry, the game lets you choose between your basic weapon and the upgraded version offered.

Gogma reinforcements come in 2 to 3 versions, the strongest ones being the EX one.
| Boost | II | III | EX |
|---|---|---|---|
| Attack | +6 | +9 | +12 |
| Affinity | +6 | +8 | +10 |
| Element | +60 | / | +90 |
| Sharpness | +30 | / | +50 |
| Ammo | +1 | / | +2 |
A weapon can have 5 EX rolls but can’t have more than 2 rolls of the same category and level. To give a few examples:
- Possible: 2 Attack Boost EX + 2 Affinity Boost EX + Sharpness Boost EX
- Impossible: 3 Attack Boost EX + 2 Attack Boost III [> 2 Boost of the same type]
- Possible: 2 Attack Boost EX + 2 Attack Boost III + 1 Attack Boost II
Rerolling your Gogmazios weapons
The talents and bonuses of Gogmazios weapons are not random. They are based on tables with a predefined seed, and knowing how to manipulate these tables can help you save some materials.
First, the talent tables and bonus tables are independent.
Second, as with Artian weapons, weapons have tables for each element with predefined results. For example, fire Lances have their table, dragon Lances have theirs, dragon HH have yet another, and so on. You can check a weapon’s table by rolling your stats, then returning to the main menu without saving, and repeating the process for each element/status weapon you want to test. For example, here’s what would happen if I were to reroll the bonus on a fire Lance three times, return to the main menu or quit the game without saving, then do three rolls with a dragon Lance and then repeating the process with another dragon Lance:
| Roll | Fire Lance [Attack] | Dragon Lance [Attack] | Dragon Lance [Affinity] |
|---|---|---|---|
| 1 | Sharpness +50 (EX) Element +210 (EX + II + II) Affinity +10% (EX) | Attack +18 (EX + II) Element +90 (EX) Affinity +12% (II + II) | Attack +18 (EX + II) Element +90 (EX) Affinity +12% (II + II) |
| 2 | Attack +9 (III) Element +180 (EX + EX) Affinity +14% (III + II) | Sharpness +30 Attack +30 (EX + III + III) Element +90 (EX) | Sharpness +30 Attack +30 (EX + III + III) Element +90 (EX) |
| 3 | Attack +24 (III + II + II) Element +60 (II) Affinity +10% (EX) | Sharpness +50 (EX) Attack +21 (EX + III) Element +120 (II + II) | Sharpness +50 (EX) Attack +21 (EX + III) Element +120 (II + II) |
Advancing in the table of one weapon advances the tables of all weapons.
| Roll | Résultats |
|---|---|
| 1 [Fire Lance] | Sharpness EX +50 (EX) Element +210 (EX + II + II) Affinity +10% (EX) |
| 2 [Dragon Lance] | Sharpness +30 Attack +30 (EX + III + III) Element +90 (EX) |
| 3 [Fire Lance] | Attack +24 (III + II + II) Element +60 (II) Affinity +10% (EX) |
The Amend (Keep Bonuses) option also advances the tables by one step. Its results are also predetermined in the same fashion using a table per weapon and element.
This knowledge allows you to read your rolls in advance on multiple weapons simultaneously, and then determine which rolls are worth the cost. For example, I have 5 elemental Lances and I’m aiming for 3 Attack, 1 Sharpness and 1 Element. I gather a huge Oricalcite stock then I start rolling one element before going back to main menu without saving, noting when I get the desired outcome (I personally use the state of my Oricalcite stock, noting in the following example « Dragon 1707 », more efficient and less risky when you’re doing 20/30 rolls back to back). I do the same for all 4 elements and then I can make this little video:
As for the set skills, here too the tables are common amongst weapon and element et here too, doing one roll will move the tables by one step.
Furthermore, upgrading an Artian weapon to a Gogma weapon triggers a roll, advancing the tables. So be careful when creating a new Gogma weapon. Obviously, it will use the next roll from the corresponding table (if my attack fire Lance has Rathalos/Gogmazios as its future roll 1 talent, creating a new affinity fire Lance for example will give it Rathalos/Gogmazios upon reinforcement). The number of Tarred Devices consumed for the upgrade has no impact on table progress; you will always advance one roll.
This knowledge can allows you massive savings on Tarred Devices. Indeed, rerolling the talents of a Gogmazios weapon costs 3 Devices of the same augment type as your weapon or 6 of another type.

Since you can see into the future and know, for example, that roll #15 is worth the cost, you can create two « junk » Gogma weapons. These weapons will be crafted using the two types of Tarred Devices that your main weapon doesn’t use and can do the previous 14 useless rolls at half price on these before you use the good Devices on your main weapon to receive the desired 15th roll.
Just like before, it’s also possible to roll multiples weapons in parallel and keep the best ones. And just like before, here’s a demo of the results you could get. For context, I was looking for the Nu Udra skill on my elemental Lances (to use Bad Blood when a block left me with some red health), starting with the dragon element… But I ended up getting a god roll (to memorize when it will come despite the Tarred Devices varying costs, I used my zennys, noting that the god roll would come at 9 947 265z). I obviously went back to the main menu, started to roll my fire weapon looking for the Nu Udra skill before reaching the god roll… And I ended up getting the desired skill right before the dragon god roll.
Fighting Gogmazios efficiently
Gogmazios is a fight with many gimmicks, and a few adjustments to your strategy can make all the difference. The first notable feature is that it doesn’t scale with multiplayer. Whether you fight it solo or with four players, it will have 410,000 HP and the same partbreak and elemental trigger thresholds.
Phase 1
Use a fire weapon to soften Gogmazios’s parts by liquefying the oil covering it. Raw and dragon hitzones of the liquid parts are increased compared to their solid version. Don’t bother switching to a dragon weapon during this phase because of Seikret’s bad responsiveness and Gogmazios’s mobility; you’ll likely waste more time chasing after the softened parts than dealing damage. The winglegs are the easiest part to reach, so focus your attacks there, as they can bring it down during this phase. Also note that Gogmazios’s chest becomes liquid when it enrages.
Don’t hesitate to use environmental traps. Three gas deposits are available and can be activated with fire pods, bowguns fire ammos or Gogmazios’s fiery attacks to trigger lava eruptions, dealing up to 4 hits of 2050 damage each. This damage also tends to flinch the Elder Dragon, making it easy to inflict 8200 damage (2% of Gogmazios’s HP). It also deals huge fire damage to the part it hits, being able to easily turn it liquid.
You can also drop a Deteriorated Scrap Metal boulder on him for an easy 4100 damage (keep the one close to the ledge for phase 2).
Support Hunters will help you during this phase. Fabius will sometimes draw aggro and block a oil spit from Gogmazios giving you an opportunity to attack safely.
At one point during the fight, Nadia will fire a powerful shot that will destabilize Gogmazios and allow you to grab Compact Anti-Wyvern Guns on its body with your slinger.
The Aquatic/Oilsilt Mobility skill lvl 1 can be useful during this phase as Gogmazios tends to throw a lot of dragon oil around, limiting your movement speed.
When Gogmazios HP goes under 356 700 HP (87%), he runs towards the middle of the area and starts firing its laser, increasing the heat and forcing you to get on the ledge for phase 2.
Compact Anti-Wyvern Gun
These are powerful slinger ammos. They deal blunt damage but don’t deal any KO damage and have a MV of 150 with a 70 dragon element value. They can be charged to increase their raw damage, tripling their MV to a ridiculous 450 (a fully charged TCS « only » deals 267 MV). It’s especially useful in the last phase of the fight, where dealing damage to the flying Gogmazios can ground it. Also note that charging the Gun won’t increase its dragon damage.
Phase 2
In this phase, Gogmazios is much less mobile and the platform is smaller, allowing your Seikret to reach you more quickly. Start attacking with fire weapons and don’t hesitate to switch to dragon weapons when the oil turns liquid. This phase is also your best opportunity to destroy Gogmazios’s chest if you want. It’s not a weak point, but it’s the hardest part to reach and break under normal circumstances, and basically the only partbreak you could miss in the fight (allowing you to obtain a Gogmazios Lacerator, a fairly rare drop guaranteed on the back and chest partbreaks).
When the phase begins, if you have Torch pods, you can shoot the gas pocket to the right of Gogmazios. The ensuing lava eruption can deal up to three hits of 2050 damage each while it’s trashing around. After this, rush to the ledge where the Support Hunters are located and immediately grab a Chillmantle Bug from the left wall. You can then go to the other side and throw some Hunks of Blastcoal at Gogmazios as it moves into position.
Regarding environmental traps, if you didn’t use it in phase 1, there’s a Deteriorated Scrap Metal boulder you can drop on Gogmazios to interrupt an attack right as the phase begins. There’s also a battering ram built into the wall. Lure Gogmazios near the lever to hit it with a powerful 8200 HP attack that will knock it down. Note that it’s vulnerable to the battering ram at the beginning of its phase transition to the final area (but it’s a double-edged sword, explained below).
When Gogmazios falls, destroy its back as quickly as possible to retrieve the Converging Elderbreaker. Once the weapon is dislodged, you must connect it to the Nexus using Wyvern Milk Fibers found at three locations in the arena. Support Hunters typically connect one, leaving you with two to connect. The Outdoorsman skill is really useful for this task as it increases your movement speed while carrying items, including Wyvern Milk Fibers. The more fibers you connect, the faster the cannon will charge. If you don’t connect all fibers, the cannon max charge will cap at respectively 40 and 70% based on the numbers of fibers connected (if you’re with Support Hunters, one will go plug a new fiber as the cap is reached). Note that it is possible to fire the cannon prematurely. At full charge, the cannon deals 67,650 HP (16.5% of Gogmazios’s total health).
When Gogmazios health drops under 190 650 HP (46,5%), the final phase transition starts. Note that there is a 176 710 (43,1%) HP hard cap during this phase transition (which means that while it’s easier to use the battering ram here, it might be more useful to trigger it before to avoid risking to lose some of its damage, especially since the phase transition is usually triggered by the Elderbreaker massive 16,5% damage). During the phase transition, Compact Anti-wyvern Guns gets exposed on its body. Grab some before starting the climb to the final area.
Final phase
Gogmazios’s final phase is a constant dps check. It’s not based specifically on dragon element but Gogmazios becomes really weak to this element during this phase so grab your dragon weapon during the climb, sharpen it and get ready to be agressive. Gogmazios will begin the phase in its gaseous state, increasing its hitzones and becoming more vulnerable but also more destructive. He will then trigger a nova, temporarily gets back to liquid state, then in its gaseous state as it enrages, nova, liquid state, gaseous state, you get the idea. Gogmazios dragon HZV are as follows:
| Parts | Gaseous | Nova | Liquid |
|---|---|---|---|
| Head/Wings | 50 | 65 | 25 |
| Tail | 40 | 65 | 15 |
| Gogma Mats | 55 | 65 | 55 |
| Legs | 0 | 65 | 0 |
When Gogmazios gets in its gaseous state, he will start a scripted attack where it takes flight and starting firing its laser all over the place while throwing burning oil. When he initiate this move, he will also drop 2 Compact Anti-wyvern Guns. For the first instance of this attack, once you reach the summit, go straight to the elevated ledge in front of you. The position is only available for this time and puts you in total security, allowing you to shoot freely. It’s also a good position to survive Gogmazios’s first nova, notably if you failed the dps check, but it will get destroyed after this move. For the following gaseous state transitions, staying right under its body is a good strategy to totally avoid the chaotic move.
Compact Anti-wyvern Guns charged shots are your best options when its flying, while trying to aim at the Gogma Mats clusters for increased damage. The clusters have 3750 HP, destroying one will grant you precious Armaments but also a new lot of Compact Guns to keep shooting.
Dealing enough damage to Gogmazios while it’s flying (5625 HP for the first time, 6250 HP the second time, 7500 HP for subsequent attempts) temporarily grounds it with a special animation. If you manage to damage the wing near the ground in this special state (2500 HP the first time, 3750 HP for subsequent triggers), it will fall completely to the ground. If you don’t deal enough damage, the damage is saved for the next time he enters this special state.
There are also 2 Unstable Chimneys which can be triggered with your slinger to put it to the ground, allowing you to use your weapon freely. Since in a normal fight, you should deal with 3 gaseous state transitions, try using one Chimney per phase to get 2 easier dps checks.
During the fight, Nadia will tell you if you’ve managed to keep Gogmazios’s power in check. When the nova begins, Gogmazios flies towards the area midde then starts overheating, taking even more damage in this state. Note that during this state, his parts take no damage at all (including Gogma Mats clusters). So just go ham on its tail to get as much damage as possible while being careful about the ground explosions. When he takes flight, the real nova begins.
Two scenarii can happens based on the success or failure of the dps check:
- if you failed, Fabius won’t say anything and will start running until the inevitable cart
- if you succeeded, Fabius will tell you to get behind him, creating a protective area with its shield
The attack itself if you succeed isn’t that dangerous if you’re far enough. Gogmazios’s breath will deal continuous damage, these being reduced if you’re guarding and totally cancelled if you’re behind a hunter guarding. But even staying out in the open doesn’t deal that much damage (especially since Support Hunters tend to heal you). At the attack epicenter, fire ball falls from the sky, dealing hits that can hits hunters in a shielder protective area and drains the shielder stamina so be careful to not stay too close. When the nova ends, Gogmazios will dive to the ground, inducing a huge area explosion before getting back to its liquid state. This is a rather strange move as it will hit all players who aren’t guarding or in a shield protective area… But it will not hit the players respecting these conditions (there’s literally no shielded hit and no even a weak knockback).
Once it’s low enough on HP, Proof of a Hero starts playing after a nova, meaning the fight is basically over. Hold on a little longer to enjoy the taste of your sweet victory!
